
Setup your workspace, sub-account and AI
Follow the steps in the Quickstart guide in order to get started from 0, all the way to a conversing AI model.Create & Access Your Account & Workspace
- Navigate to the Agency Workspace
- Determine which plan of GoHighLevel you are on to find your GoHighLevel Integration type for step 2
Connect to GoHighLevel
- Unlimited (297 / mo) & SaaS Pro (497 / mo)
- Go to the workspace Launchpad
- Click on Connect To HighLevel & navigate the checklist
-
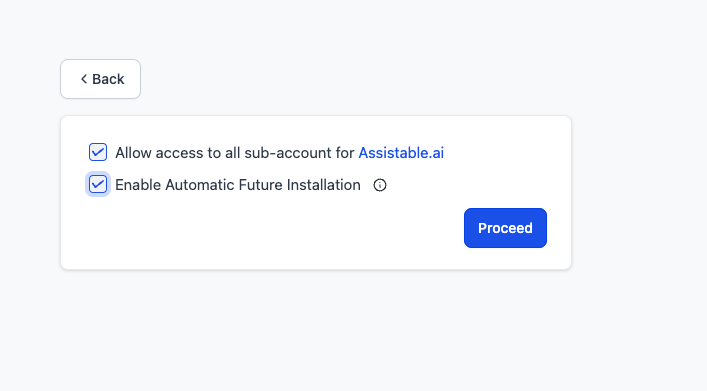
Make sure to select your Agency - not any sub-accounts - since we are doing an agency level connection
- Make sure to allow access to all sub-accounts - this allows us to connect to your sub-accounts on behalf of you
- Make sure to enable automatic future installation - if you do not, you will have to do this again in the future
-
On redirect, select your workspace to link the connection
- Starter (97 / mo)
- Navigate to the Subaccounts tab
- Click on Create Account in the top right corner, then select Direct Connection
-
Select the sub-account you want to connect
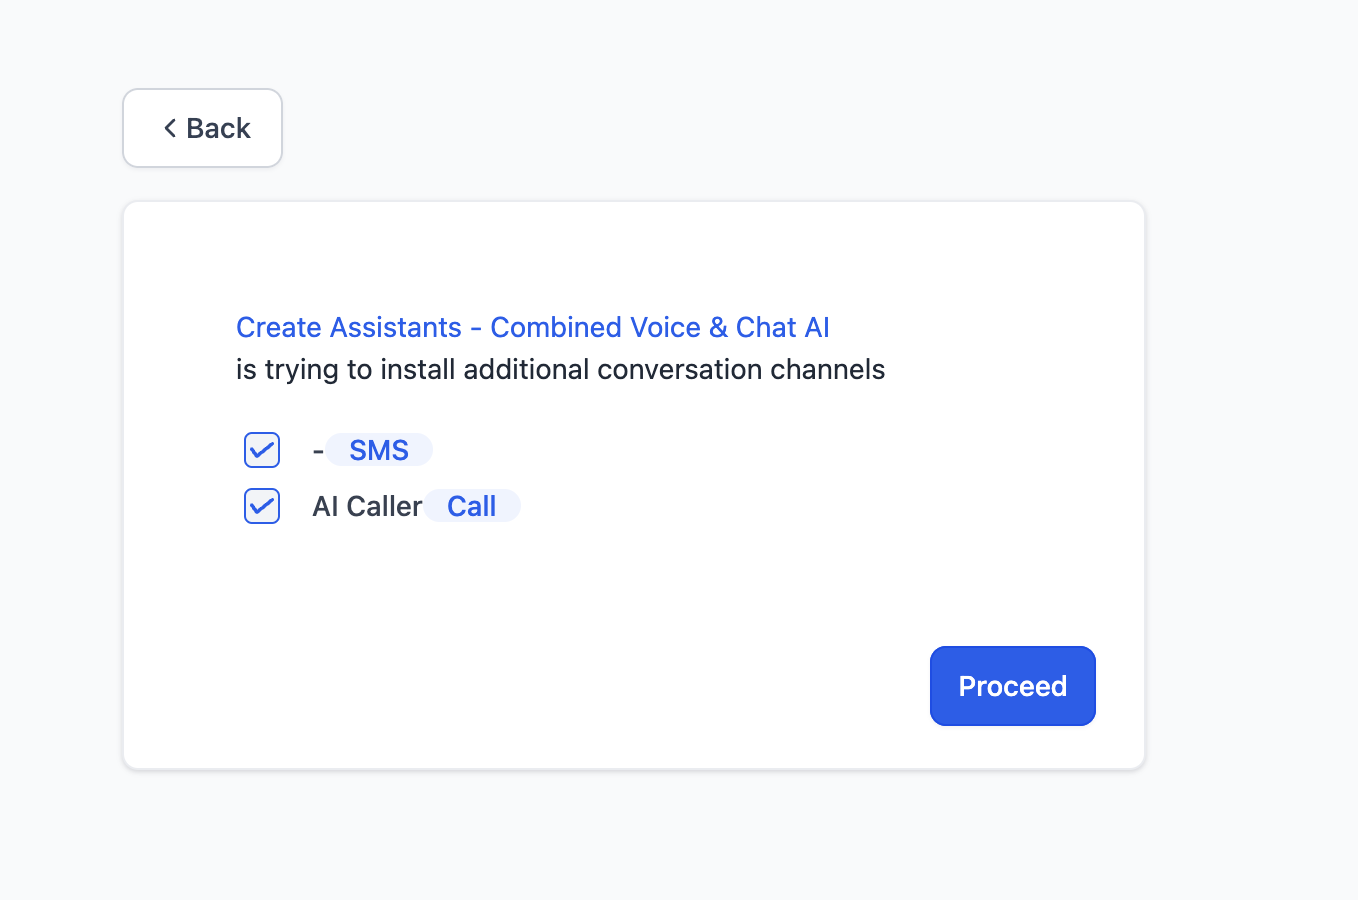
- Allow the two conversation providers - these are for AI voice calls syncing with GoHighLevel and custom widgets
-
You’ll be automatically connected & redirected to sub-account you selected - if this is your first time connecting to this account, the sub-account can now be found inside of your workspace

Sync Your Sub-Accounts
There are a couple of ways you can sync your sub-accounts with your workspace to start using your new AI.
Custom Menu Link:
The custom menu link is a unique link that allows you to create sub-accounts in a scalable way. Using our Click-To-Create system, the link allows us to grab the location ID, link it with your agency ID and automatically create, link and connect with that sub-account. This makes sub-account creation and integration happen in seconds, instead of minutes.Your custom menu link will have a variable {{location.id}}, please do not edit this custom menu link or pre-fill that value - it will be done for you on the backend
- Navigate to your workspace’s Launchpad
-
Click on “Copy Custom Menu Link” to get your custom menu link
- You are able to allow automatic invite to clients when they sign up, you can toggle this on or off depending on your preferences and security compliance
- Navigate to your GoHighLevel agency view
- Go to Settings, and then go to Custom Menu Links
-
Create a new custom menu link
- Your link icon can be whatever you would like, this will be customer facing
- Your link name can be whatever you would like, this will be customer facing
- Paste your custom menu link exactly as copied
- Turn off agency side bar in the sidebar preferences since your agency does not have a location ID
- Select your roles and accounts you want to give access to the AI
- Allow microphone permissions in order to use the voice lab in testing
- Navigate to any of your sub-accounts that has access to the custom menu link, click on the custom menu link and your account will be created and linked automatically (If you have an agency connection, it will be automatically integrated with GoHighLevel as well)
Direct Connection:
The direct connection is a great way to connect and create sub-accounts by using the sub-account integration method from GoHighLevel. Direction connection is a great way to connect your agency’s workspace with outside sub-accounts since it is integrated at the sub-account level. The downside of direct connections is that it will have to be done with each sub-account.When using the direct connection and the account is new: the account will be created, linked with your workspace and connected to GoHighLevel using the sub-account level integration. If the account is existing, the sub-account level integration will be refreshed.
- Navigate to your workspace’s Subaccounts tab
- Click on the “Create Sub-account” in the top right, then click “Direct Connection”
- Select your sub-account in the GoHighLevel integration modal
- You will be re-directed and the account will be created
- You can access the sub-account using the “Open in new tab” button, clicking on the sub-account in your workspace’s list or using the custom menu link in the sub-account in GoHighLevel
Create Your First Assistant
Assistant creation can be done in seconds. The easiest way, which we will use in this example, is to have the system generate it for you.
Assistant creation can be done in multiple ways and further configuration may be required to achieve your desired result - for this example, we will build a simple assistant using the “Generate for me” button
- Navigate to your sub-account and click on the custom menu link OR open the sub-account in a new tab from the workspace
- Navigate to the assistants tab, click on “Create Assistant” in the top right and then click “Generate for me”
-
Input the name and description of the assistant you want to create - you can use the example in the top right of the popup
- The name is just an internal name
- The description is a brief description of what you want the assistant to do
- After the loading is complete, your newly created assistant will be in your account ready to use
Converse with your AI
Your assistants are multi-modal meaning they are not confined to one channel - they are able to converse in both voice and text channels inside of GoHighLevel.To converse with your assistant, let’s break it down by method of communication:
A rule of thumb:Text based channels (SMS, FB, WhatsApp, IG, etc) require an Active TagVoice-based channels (Inbound, Outbound and Web Calling) require a phone number or a widget
Text / Chat 📞
In order to converse in chat channels, we just need an Active Tag on the contact to process the response. The basics of how it works, if there is an active tag on the contact - the assistant corresponding to that active tag will respond. If there is not an active tag on the contact - no assistants will respond but the message will be stored for memory in the future.What is an Active Tag?The reason we are able to work with no workflows, API calls or webhooks is because of our application layer of Active Tags. We collect all inbound and outbound messages (except email) and store them in a permanent conversation memory. So how would we know when to reply? and with which assistant to reply? We do this with active tags.They are tags that are “looked for” when a message comes through from a contact. If we see an active tag, we find the assistant that correlates with the active tag that we found and send the response from that specific AI.- Navigate to the contact you want to converse with and add your active tag.
- When an inbound message comes from that contact (i.e. you message your GoHighLevel number, chat widget, or social media account), we will see your active tag, match it to the assistant and generate the response.
Voice 📞
In order to converse in voice, we are a few ways to do so:- Inbound / Outbound Calling
- Web calling / Orbs
- To make an outbound call, navigate to your GoHighLevel workflows in the automation tab.
- Open a workflow or create a workflow where you would like to make a call.
- Click on the ‘Plus’ icon in the workflow to open up the workflow actions - from here, scroll to the bottom and you will see Make AI Call. Click on that action to add it to the workflow.
- Add your assistant ID (your assistant ID can be found in the top left of the assistant configuration under the name), and variables if you would like them. Note: All contact information is pre-filled for you, custom variables are for true custom information.
- Run a contact through the workflow. The contact will automatically be called from the assistant ID that was inputted and the conversation, as well as a call briefing, will be added to the contact post-call finish.
- To accept an inbound call, just call your phone number after it has been attached to an assistant.
- If you number already exists inside of GoHighLevel, we will pull the information that is available for the contact. If you number does not exist inside of GoHighLevel, we will create a Guest CallerID inside of your sub-account.
- The contact that made the call will receive the conversation, as well as a call briefing, will be added to the contact post-call finish.
- To use the orbs / widgets to make AI calls in your browser, create a widget in the widget tab and connect your assistant.
- Copy the code snippet from the orb and place it on your website.
- Simply click the orb inside of your browser where you placed it on your website and converse with the assistant.
- A Guest CallerID will be created the first time an orb is used, and consequent uses will remember the information from the contact in GoHighLevel using the cookies we placed in the user’s browser.
- The contact that made the call will receive the conversation, as well as a call briefing, will be added to the contact post-call finish.
Quickstart Guide
Connect To GoHighLevel
Connect To GoHighLevel
🚀 For 297 & 497 plans of GHL:Agency level connection
- Navigate to your Launchpad and click on ‘Connect to HighLevel’.
- Click through the checkboxes until you are at the GoHighLevel modal.
-
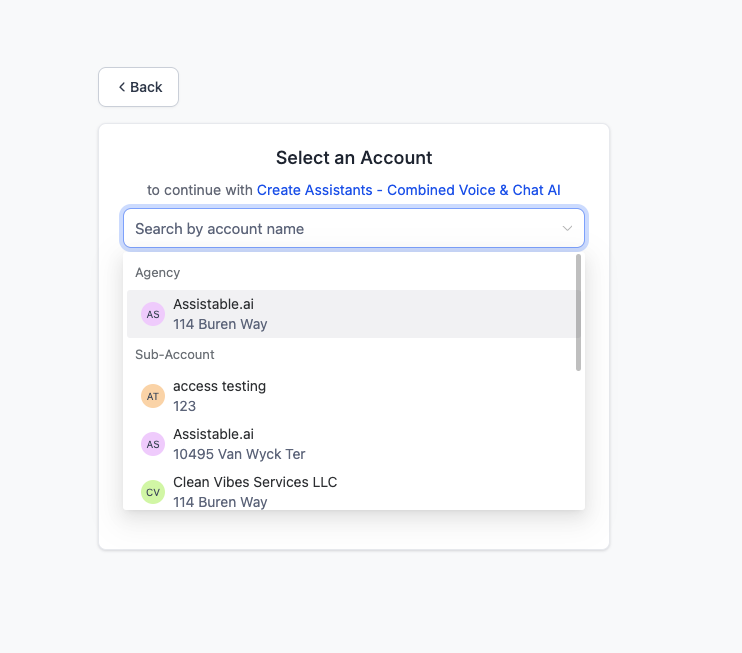
We are doing an Agency Connection so click on your Agency, not an individual sub-account.
- If you do not see your agency, go to app.gohighlevel.com and ensure you are logged in as an agency admin on the root domain.
- If you still don’t see you your agency, use an incognito browser.
- Your agency, and any current and future sub-accounts will automatically connected via your agency connection now.
- Navigate to your Sub-accounts and click on ‘Create Account’ in the top right.
- Click on ‘Direct Connection’ since we are doing a direct connection to a sub-account.
-
We are doing an Sub-account Connection so click on your Sub-account to connect it.
- If you do not see your sub-account, go to app.gohighlevel.com and ensure you are logged in on the root domain.
- If you still don’t see you your sub-account, use an incognito browser.
- Your sub-account will automatically be created and connected for you via the sub-account connection - if the sub-account already exists, the connection will refresh.
Create Your Sub-Account
Create Your Sub-Account
There are a few ways to create sub-accounts in your Agency’s workspace depending on your business model.
-
Using Your Custom Menu Link: In your Launchpad or Sub-account tab, you will be able to access your custom menu link.
- Copy Your Custom Menu Link from the popup.
- Navigate to app.gohighlevel.com, then Settings, then Custom Menu Links.
- Create a new custom menu link. Configure it how you would like and paste your custom menu link in the URL input section. Turn on the menu link for sub-accounts and turn it off for the agency (since your agency does not have a location ID).
- Navigate to the sub-account you want to deploy your AI to, and click the custom menu link. The account will automatically be created, connected (if you have an agency level connection) and displayed inside the sub-account.
Pros to custom menu link:
- Easy to scale your internal sub-account AI deployment since all it takes to create and connect the account is with a click on the menu link
- Native and easy integration
-
Using Direct Connection: In the Sub-account tab when clicking on Create Account, you can use the direct connection option from the dropdown.
- Navigate to the sub-account tab, click on Create Account and then click Direct Connection.
- You’ll be redirected to the GoHighLevel connection modal. Here you will select the Sub-account you want to create and connect. Allow the custom conversation providers and settings.
- You’ll be redirected to the newly created and connected Sub-account after the modal. You’ll notice this sub-account is now showing inside of your workspace’s sub-accounts.
Pros to direct connection:
- The creation path for $97 / mo GoHighLevel accounts (since its a sub-account level connection)
- Isolated connection for the specific sub-account
- Allows you to connect to internal sub-accounts, or external sub-accounts (sub-accounts that are not inside your agency in GoHighLevel)
Create Your First Assistant
Create Your First Assistant
Navigate to your sub-account either inside of GoHighLevel or using the Open in a new tab option in the sub-account view in your workspace.Once in your sub-account, let’s go to the Assistants tab. Once here, there are a few ways to create assistants but let’s use the easiest way - generating the assistant for us.
- Click on Create Assistant in the top right corner, then click on Generate for me.
-
Input the name of your assistant and a brief description of what you want. If you are unsure of what to input, click on the Show Example button to see an example.
- Name: The name of the assistant is just an internal name - just as you would name a workflow in GoHighLevel.
- Description: A brief overview of what you want the assistant to do and how to do it.
- After a moment, your assistant will now be created in your sub-account. You can now click on it to see what was generated for the prompt and configure it as you would like.
Deploy In Voice & Chat Channels
Deploy In Voice & Chat Channels
Your assistants are multi-modal meaning they are not confined to one channel - they are able to converse in both voice and text channels inside of GoHighLevel.To converse with your assistant, let’s break it down by method of communication:
A rule of thumb:Text based channels (SMS, FB, WhatsApp, IG, etc) require an Active TagVoice-based channels (Inbound, Outbound and Web Calling) require a phone number or a widget
Text / Chat 📞
In order to converse in chat channels, we just need an Active Tag on the contact to process the response. The basics of how it works, if there is an active tag on the contact - the assistant corresponding to that active tag will respond. If there is not an active tag on the contact - no assistants will respond but the message will be stored for memory in the future.What is an Active Tag?The reason we are able to work with no workflows, API calls or webhooks is because of our application layer of Active Tags. We collect all inbound and outbound messages (except email) and store them in a permanent conversation memory. So how would we know when to reply? and with which assistant to reply? We do this with active tags.They are tags that are “looked for” when a message comes through from a contact. If we see an active tag, we find the assistant that correlates with the active tag that we found and send the response from that specific AI.- Navigate to the contact you want to converse with and add your active tag.
- When an inbound message comes from that contact (i.e. you message your GoHighLevel number, chat widget, or social media account), we will see your active tag, match it to the assistant and generate the response.
Voice 📞
In order to converse in voice, we are a few ways to do so:- Inbound / Outbound Calling
- Web calling / Orbs
- To make an outbound call, navigate to your GoHighLevel workflows in the automation tab.
- Open a workflow or create a workflow where you would like to make a call.
- Click on the ‘Plus’ icon in the workflow to open up the workflow actions - from here, scroll to the bottom and you will see Make AI Call. Click on that action to add it to the workflow.
- Add your assistant ID (your assistant ID can be found in the top left of the assistant configuration under the name), and variables if you would like them. Note: All contact information is pre-filled for you, custom variables are for true custom information.
- Run a contact through the workflow. The contact will automatically be called from the assistant ID that was inputted and the conversation, as well as a call briefing, will be added to the contact post-call finish.
- To accept an inbound call, just call your phone number after it has been attached to an assistant.
- If you number already exists inside of GoHighLevel, we will pull the information that is available for the contact. If you number does not exist inside of GoHighLevel, we will create a Guest CallerID inside of your sub-account.
- The contact that made the call will receive the conversation, as well as a call briefing, will be added to the contact post-call finish.
- To use the orbs / widgets to make AI calls in your browser, create a widget in the widget tab and connect your assistant.
- Copy the code snippet from the orb and place it on your website.
- Simply click the orb inside of your browser where you placed it on your website and converse with the assistant.
- A Guest CallerID will be created the first time an orb is used, and consequent uses will remember the information from the contact in GoHighLevel using the cookies we placed in the user’s browser.
- The contact that made the call will receive the conversation, as well as a call briefing, will be added to the contact post-call finish.